- Introduction to WorkXpress
- Building Your Application
- Examples and Best Practices
- Technical Manual
The global app settings is something that is created in most applications in order to create settings that will pass from development to production, like storing payment keys and other configurations. The global application settings table also allows you to set defaults and filter database-driven selection fields.
This table will have only one record. You many end up with a lot of fields on this table, but that is ok. You can use tabs or ribbons to organize the fields into groups.
| Create a table from the Block Creator or Handbook and call it Global Application Settings. A good place to put the link for this table is on the Admin page. When asked by the wizard how you wish to view, add, and edit Global Application Settings, choose to have a list page created. |  |
| Because we want this table to have one and only one record, we need to run an evaluation when the link is clicked. Bring up the Automation Layer and click on the actions for the link you just created. Use a Does Record Exist? action to check if there are any existing records on the Global Application Settings table. The context for this query will be all the records in the Global Applications Settings table. If you are building a multi-tenant application make sure to run this query without the tenant limitation. |  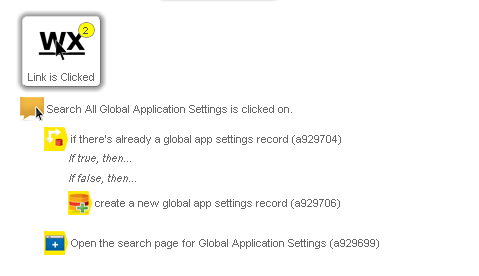 |
| In the Action Manager, click on the open page action to bring up its settings. Set the page to open to be the View page. Click the checkbox to change the page's context to all records for Global Application Settings. Then choose to change the behavior of the opened page to View mode only and also select View as the mode in which the page will initially be displayed. Click Save. |  |
| From the Admin menu, click the link to open the Global Application Settings page. On this page, bring up the Presentation Layer for the field grid that has been automatically created. Change the title to Global Application Settings. Check the box on the setting to Allow Form to Be Saved Independently of the Page, then click save. |   |
There will be a sample record that has been created. Detach this field from the form so that it does not show. You can now add other settings that you would like, such a default From Address for outgoing emails or payment information.
For this example, I have added the following fields:
You could put all your fields on this one form, but that may be confusing. Let's add some navigation and organization.
| Add a ribbon form before the grid form that is on the page. Call it Global App Settings Navigation. When prompted, choose to create a new field to store the options and call it “Navigation Options”. For this example, we're only going to use the option name. Add Email Settings and Payment Settings as the options and click Select. | 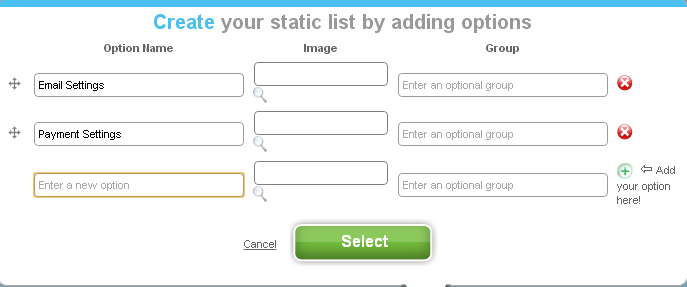 |
| For Header Settings, choose to Hide the Title bar, then click the Sizing tab. Change the Tile Height setting to 25. |  |
| Drag the grid form onto the ribbon form. Bring up the settings for the grid form and Hide the Title Bar. Click Sizing and change the Form Width to 50. Then click Grid Columns and change the Number of Columns setting from 2 to 1. | 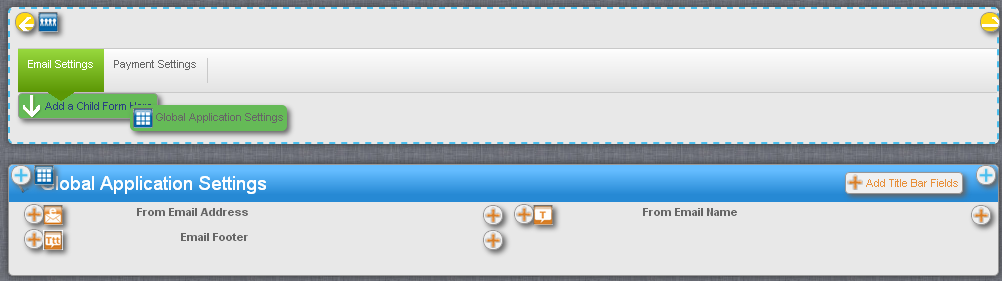 |
| Your form should now look like this. |  |
| Bring up the Automation Layer and click on the field grid to bring up its Action Manager. Drag a Set Modes action to the Global Application Settings blue trigger drop point. When prompted, choose Edit and View as available mode and set View as the mode in which the form will initially be displayed. You will need to repeat these actions for setting the mode on any other field grids you add to other tabs in the ribbon. |  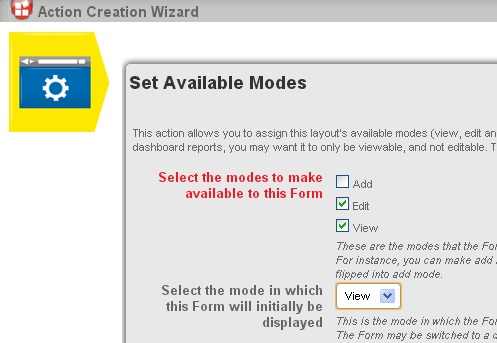  |
| You can now edit this form and fill in your settings. |  |
You can now reference these fields in other interfaces when you need them.


