- Introduction to WorkXpress
- Building Your Application
- Examples and Best Practices
- Technical Manual
The Query Builder is a visual tool that enables you to easily build and manage complex queries to retrieve information from the records in your tables. By using filters in the Query Builder, you can retrieve only those records which match your chosen criteria.
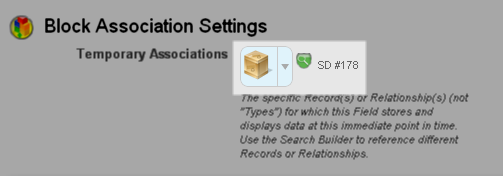
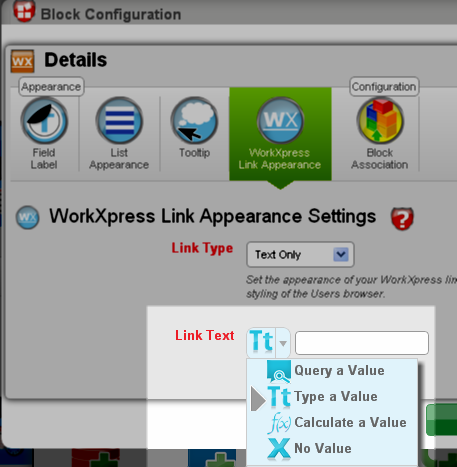
The Query Builder will be in locations where it is possible to build a query. For example, in the Temporary Block Association setting you use the Query Builder to define the context of the field. In the WorkXpress Link Appearance you can build the text for link in several ways, one of which is by building a query.
| Examples of Query Builder Locations | |
|---|---|
| Block Association Setting | Field Setting |
 |  |
The Query Builder has a seven parts. There are five different starting points for your query based on context, an option to select relationships to a context, and an option to open the Advanced Query Builder.
Main article: Query Builder starting points
| This option is the current record prior to the query beginning. This can be an existing record or a new record that is being created. | 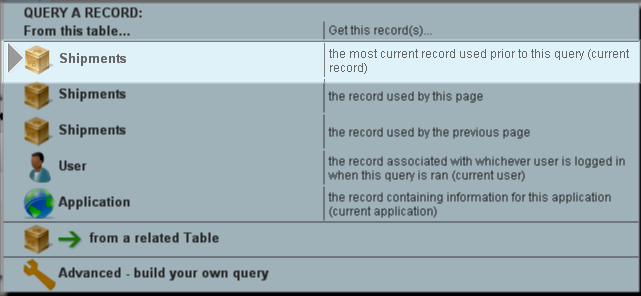 |
| This option selects the context of the current page. |  |
| This option selects the context of the previous page. Be careful when using this in a function as the context of the previous page could change depending on where the function is being run. | 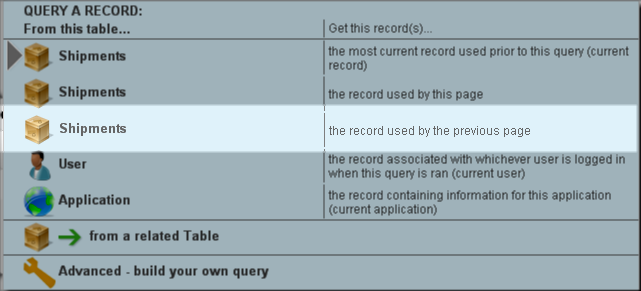 |
| This option selects the context of the currently logged in user. | 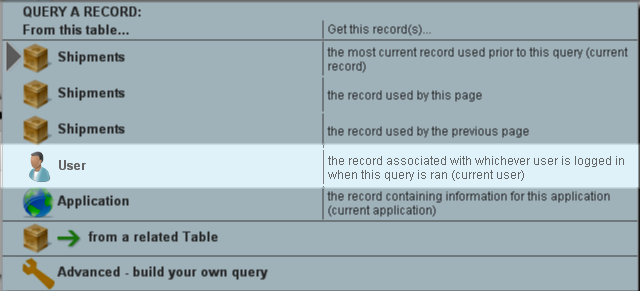 |
| This option selects the current record. | 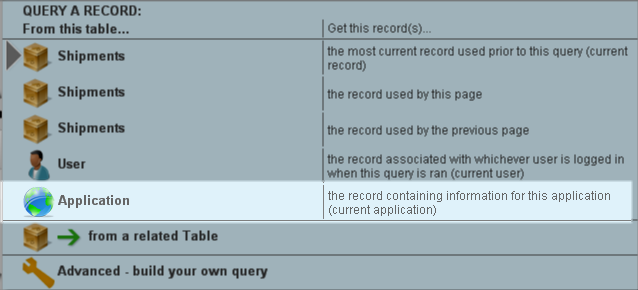 |
| This option allows you to select a related table to the context selected in the above section. | 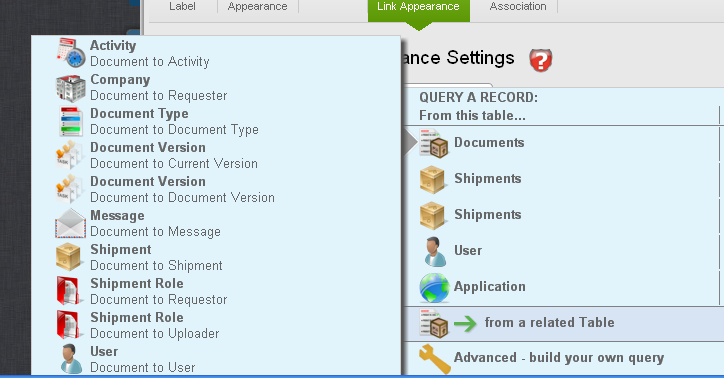 |
| Selecting this option will open the Advanced Query Builder. This will allow you to add filters to query and to make complex queries involving more than one table. |  |
In the Query Section, you will specify the details of your data query. The Query Section provides an interactive visual map of your query.

Here you will make the selection for what tables and relationships you wish to see in your query.
| Generally you will see the current context when you open up the Advanced Query Builder. | 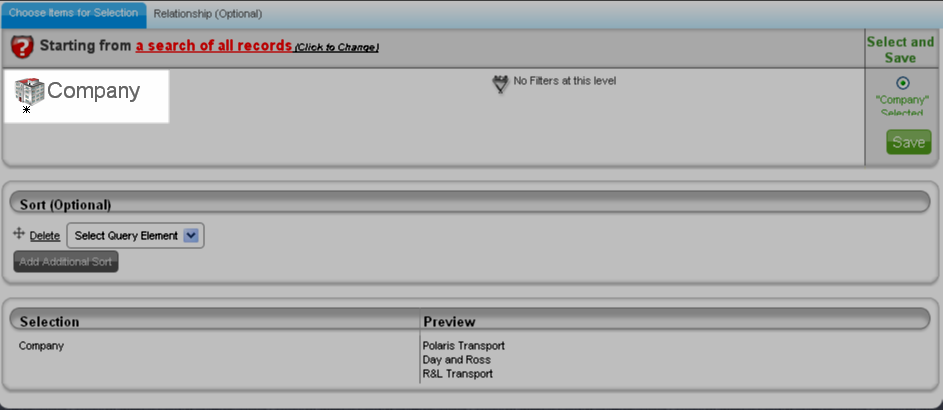 |
| Click on the table to pull up a menu. | 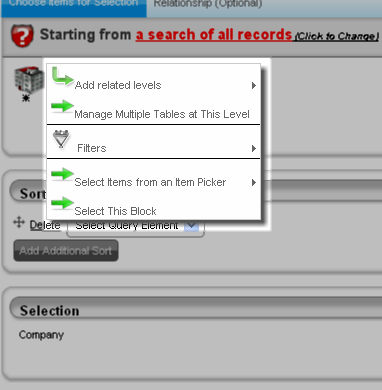 |
| Clicking on “Add related tables” will show all the tables in the application as well as any relationship that exists between the current table and the other tables. Tables which are related to the current table will have a small arrow to indicate there is a list from which to select. | 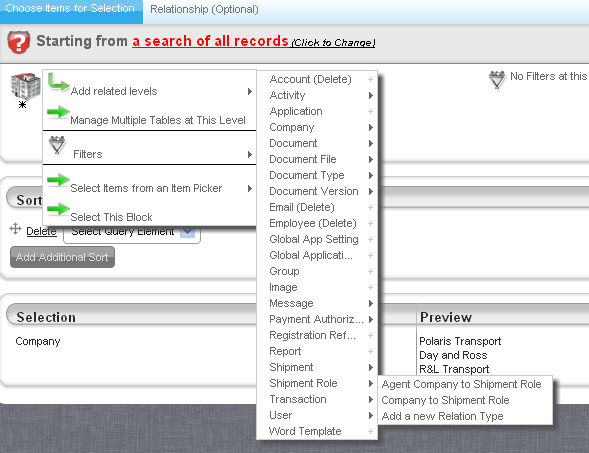 |
| Once you select a table, it will be added to the query. The relationship table is identified with a green square. |  |
| The Preview Section returns the first few results of that query given your current context. | 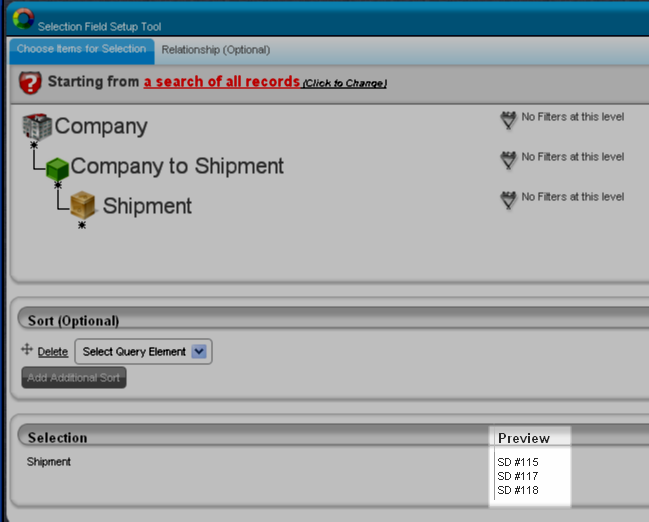 |
A Query may include the following four elements, broken out by function:
What Items or Relationships am I getting my data from?
→ Node
→ Filter
→ Path
Which data do I want to get?
→ Selection
Taken together, these are the four elements of a query, and will allow you to get any data from any part of WorkXpress. These elements are further defined below.
A node is visually represented in the Search Builder as a row or level of the query (see the image below). You can think of a node as a representation of a set of Items or Relationships from which you can get Fields of data. A more technical description is that a node is any level of the query that is represented by either an Item or a Relationship, or in some cases, a branch of a path (covered below).
Nodes are important because you can select them, you can usually select Fields of data from them, and you can apply filters to them.
Remember that the node your query begins on (the topmost node) is a special node in that it is the result of your current “context” (see Context).
The three highlighted items in the image below are each nodes:

A filter is used to restrict a node. For example, if your node is composed of “Accounts”, you might add a filter to say “Accounts <Where the status is “hot lead”>. In this example, the phrase “where the status is hot lead” is the filter you have applied to your node. The result then is that your list of Accounts will only include the smaller set of accounts that happen to be in the “hot lead” status at the time the query is performed.
Think of a filter as the tool you use to narrow down your set of records or relationship records.
Below is an example of a filter and how its icon appears in the Query Builder map when applied.


An “Item is” filter allows you to specify a record to filter down to at a particular node in your query. Sometimes you know a node needs to match a specific record, and you can find that record using the selection field provided when you choose the Item Is filter.
When using the API Query Builder tool to define your query you can add this type of filter, and pick an arbitrary record when building your query. Then, in your API call where you use the query XML, you'll see the Item Is filter there in the XML and can change out the record ID you arbitrarily selected for the one you need to use to filter for the call you're making.
A path is the manner by which two nodes are connected. In database terminology this is sometimes referred to as a “join”. For example, you might build a query of all of your Accounts and each of their Employees. You would start on the Accounts Table, path across your Employer to Employee Relationship, and then end on your Contacts Table.
Some paths can be simple, others more complex, but paths do impart complex meanings governing how you query your database for sets and subsets of information.
The image below shows the path your query follows, represented by the highlighted solid black lines:

By default, all paths are “Must” paths. That is, anything at the end of the path must exist in order for the query to return data. There are times, however, when you will want to build a path where the things on the path “Must Not” exist, or even where they “May” exist.
The image on the left shows must paths. The Search Builder has been used to change those paths in the right-hand image to a “Must Not” path between the Contact Item and the Employee to Employer Relationship, represented by a red path line, and a “May” path between the Relationship and the Company Item, represented by a grey line.

At any point in a path, you may add a branch. A branch is simply a split in the path, allowing it to take two different directions.
By default, all branches are “And” branches, meaning that “Branch A AND Branch B” must both be true. However, you can change a branch to be an “OR” branch, meaning that either “Branch A OR Branch B” must be true, but not necessarily both.

Up to this point we've discussed the three elements of a query that result in determining a set of Items or Relationships that you are seeking to act upon.
However, after you've defined the starting point, nodes and paths of your query, you will likely want to pick some results. These choices represent your “Selection”…they are the reason for your query. The selection is “the data you want to get from the database”.
One use of the Selection option is to choose a specific set of Items or Relationships. To do this you would click on the node and in the flyout menu choose “select this block”. The result will be that the Selector (the green arrow in the interface) will rest on that node.
Many times, you will use the Query Builder tool to get elements of data. Once you've built your query, click on any node and make the “Select Fields From this Block” selection. You may then select whichever Fields you wish to pull data from. The Query Builder will pull that data for each Item or Relationship represented by the node you are selecting from.
There are several activities you can perform in the course of building a query. Many of these activities can be performed in any order you choose. Building your query could involve the following activities:
In this next section, you'll learn how to perform each of the above tasks as you build your queries. Once you've built your first few queries, you'll realize how easy it is, and the process will become second nature.
By default, your query will be setup to start on the Item(s) given to it by the Block from which you accessed the Search Builder (said differently, the query will start based on the context of its parent Block; context is discussed here). You may change that context by clicking the “Change” link, located beside the description of the current context. Doing so will open a new page that will allow you to change the starting point (the context) of the query:

Several options are available to change the starting point of your query to: Use Parent's context with no changes - The default setting whereby context is simply inherited from the parent. Build your query by branching off of this starting point.
Get context from my page - Allows you to change context to a particular node from the page on which you're currently working. Chose the node you wish to start your query on and build your query from there.
Get context from the application environment - Allows you to change context to that of the current application or current user. Make your selection, and build your query from the user or application nodes, filtered to be about only the current user or application.
Derive context from a list of items - Allows you to change context to any Table you've created for your application as well as Tables created by WorkXpress when you spun up your project. Choose this Table, and build your query from that search result list (“from that node”).
In summary, you may view and change the starting context for your query using the context section of the Search Builder.
Clicking on any node will generate a menu of choices for that node. The first choice is always the “Add a Block on a new level” choice. This allows you to create a network of interconnected nodes (usually Tables and Relationship Types).
The following images illustrate the procedure of developing a simple path.
Step 1: click on any node:

Step 2: use the flyouts to select Items and Relationships you wish to path across:

Step 3: review your results. In this query, you are joining all of your Contacts and Companies using the Employee to Employer Relationship:

At the top of any segment of a path, simply click the node or asterisk and in the resulting flyout menu choose “Filters”, then “Restrict Paths”, and then whether you prefer the options of must, must not, or may.
The below chart shows your query from before with the defaulted must paths in place (the solid black lines):

To change your path restriction, start by clicking on the Node whose path you wish to restrict, select the “filter” flyout menu, then “Restrict Paths” to make your choice. We've chosen to use a must not path in the image below:

Finally, review your results. Notice the red line, which signifies a must not path. In this example, we've built the query to restrict the path so that the connection between your Contact and your Employee to Employer Relationship must not exist.

You can add a branch at any node in your query.
The simplest branch to add occurs automatically whenever you add a path to a node that already has a child path associated with it. Any node may have two or more paths extending from it, so the system automatically creates a branch.
To create this type of branch, simply follow the procedure for “Adding a Node” using a node that already has a pre-existing branch.
You may click on any node, and in the “filters” menu, you will find “Add a Branch”. Clicking this filter type creates the structure of a branch, which you can later add nodes to.
Any node may be filtered by the data in the Fields that are associated with that node.
Click on the node and choose “Filters” then “Filter this Block”. The result will appear as shown below:

You can see that filtering by any Field available for that Block is possible.
One of the WorkXpress Search Builder's more interesting and powerful features is the ability to build dynamic evaluations. These are evaluations where the value being evaluated against is itself another variable! What's more, there are no limits to how many times you can nest these evaluated filters.
For example, a normal filter might be “where the State is <Pennsylvania>”. An evaluated filter instead might be something like “where the State is <check the Current User, find which Sales Team he is related to, find which State that Sales Team is responsible for, and insert that State here>”.
You create evaluated filters while in the process of creating a static filter. In the location where the static filter is entered, look for an “Expression Builder” control. Use that Expression Builder control to define your dynamic, evaluated filter.
The goal of some Queries is simply to choose one or many Items, or one or many Relationships. To do this, first you must develop your path. Second, you must click on any node and choose “Select This Block”, as shown below:

As mentioned above, the goal of queries is to get data from the database, often by choosing a specific Field Block. There are two different interfaces that allow you to accomplish this task. One allows you to choose a single Field Block, the second allows you to choose many Fields from the Block.


Sometimes, particularly when building lists, it is necessary to adjust the “endpoint” of your query. To do this, simply click on any node, and choose the option “Select This Block”. Notice that the Selector adjusts in your query to point at the node where you chose to end that query.
The Query Builder allows you to create new Tables and Relationship Types from within the pathing flyout menus. In each case, the Query Builder will launch a wizard to dynamically create new Relationship or Tables. The example below shows the “Create Relationship” wizard launched while building a path:


