Tables
A table is a concept you may be familiar with from other database applications: it holds the records you create.
How to Create
-
Name table using the singular form. You can correct the suggested plural version if necessary.
Choose an icon.
All tables start with a
short text field called Name that is the default name of the record. (A
unique identifier in WorkXpress is created in the background and consists of letters and numbers. The default name is
not the unique identifier.) The name field can be customized later when you are adding records. For example, you could use a
save field action to set the value of the name field to be more meaningful, perhaps concatenating other fields such as record creation date and the name of the user who created the record. The name field is also the default field that will appear in a
drop down selection field. You can change this default behavior on the particular field if you wish.
You can choose to have the table added as a tab (Application Tabs are different than a
tab form), as a link on a menu, or you can set it up yourself later. If you are just beginning, putting links for your tables on one menu is any easy way to centralize access to your tables while you are building. You can click on the “Admin” link in the upper right corner of your screen to move to that screen and select a location for the table link. The wizard will reappear at the same step after you click the Admin link.
Next you will choose how you want to add records. For a simple table with only a few fields, you can choose a list with inline add/edit. However, tables can often become more complex as you develop your application, so it is best to select a list page with view/edit details page and an add page. This will make it easier for you to view, edit, and add complex records later on.
How to edit
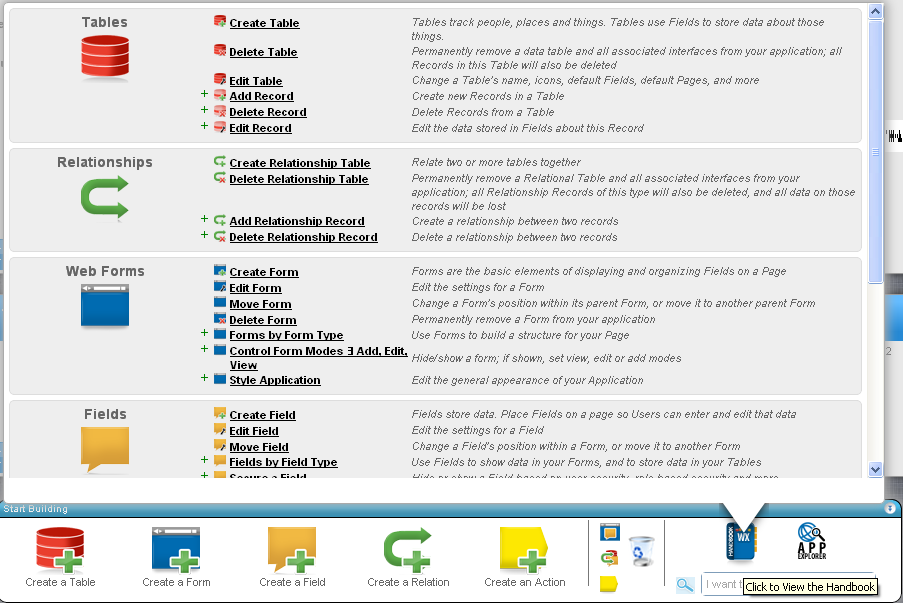
On the Block Creator, click on the Handbook  .
.
In the section on tables, you will see options for:
Create Table
Delete Table
Edit Table
Settings
To change any of the settings on a table, click the Edit Table option from the WorkXpress Handbook. Choose the table you wish to edit and the wizard will guide you through changing any of the below settings.
Table Name - This is the name (singular form) by which this table will be referred to throughout the application.
Plural Name - This is the pluralized form of the table name.
Icon - The image that represents this table.
Small Icon - This icon (small form) will be used throughout the application to refer to this table. Some examples include all
forms (except
pages) associated with this table and all automatically created links for this table (search, add, view).
Table Title Field - For any given record, use this
field as its title. For example, on a table called “Account”, the system will automatically create “Account Name” as the default title field. Only
short text fields can be used as the title field. This is used in four places in the system: 1) the contents of this field is the name by which the WorkXpress platform refers to
records in this table; 2)
selection fields that select records in a table always display the text stored in the title field; 3) it's the default text in the automatically-created view link for the table; 4) when creating lists that don't have view links, the title field gets selected to be displayed in the list by default.
 on the Block Creator.

