- Introduction to WorkXpress
- Building Your Application
- Examples and Best Practices
- Technical Manual
![]() In this lesson, we'll introduce you to the Block Creator in WorkXpress and teach you the essential skills you'll need to use it effectively when building your application.
In this lesson, we'll introduce you to the Block Creator in WorkXpress and teach you the essential skills you'll need to use it effectively when building your application.
The Block Creator, like all WorkXpress Tools, is available for use only when working with a project application and does not appear to a user working on a test or production application.
Before we begin, let's introduce the application workspace. In WorkXpress, your workspace is your application. What you see is exactly what you get. Your workspace is simply your application with the five fundamental WorkXpress Build Tools enabled. Unless you're customizing an existing application, your application won't be very complex at first and will include only a few Blocks essential to its proper function, but as you work on your project, it will develop into the rich, purposeful application you ultimately want to deploy.
First, let's look at a sample application:
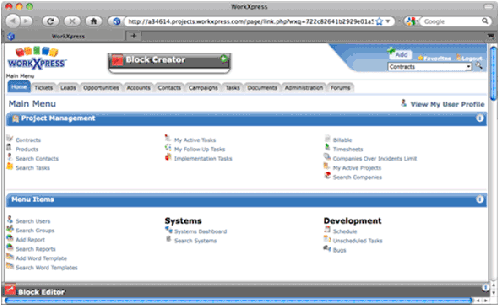
Now, let's look at the same application in workspace mode (we'll explain how to enable to the build tools as soon as we've introduced the Block Creator):

Notice that each Building Block now has an attached Block icon. Clicking on any of those icons will allow you to access the tools and settings you need to build or customize your application. Each icon is color-coded for the Block type it represents: red for Items, green for Relationships, orange for Fields, blue for Layouts, and yellow for Actions.
After completing this lesson, you should be able to answer these questions:
In your development application, the Block Creator floats above your application workspace. Double-clicking the Block Creator's title bar will contract or expand its window. Here's the application workspace from above, but we've expanded the Block Creator. Whether expanded or contracted, the Block Creator is always shown in your workspace. You may move the Block Creator around your workspace by dragging and dropping it to a convenient place.
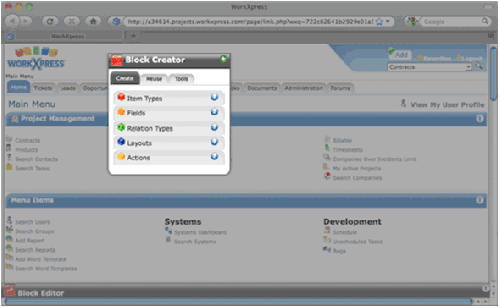 Toggling the show/hide Tools switch (
![]() /
/![]() ) on the right side of the Block Creator's title bar will enable or disable the Build Tools for your application. Disabling the Build Tools allows you to view your application as it will look to a user after it's been deployed to testing or production.
) on the right side of the Block Creator's title bar will enable or disable the Build Tools for your application. Disabling the Build Tools allows you to view your application as it will look to a user after it's been deployed to testing or production.
Across the top of the Block Creator's interface you'll find three tabs: Create, Reuse, and Tools:
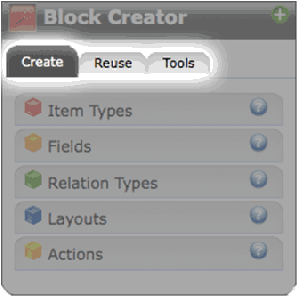
Let's examine the function of each tab.
 Clicking the Item Types bar will expand the interface to display the Add Item Type wizard.
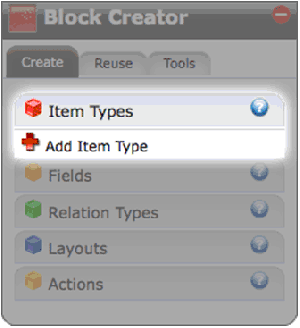
Click Add Item Type to launch the Add New Item type wizard:
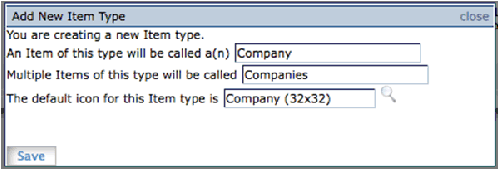
In the example above, we've answered the questions asked by the wizard to create an Item Type called Company and have chosen an icon for it. Click Save to create your new Item Type.
 Clicking the Fields bar will allow you to choose to create any of the wide variety of Fields available for you to use in your application.
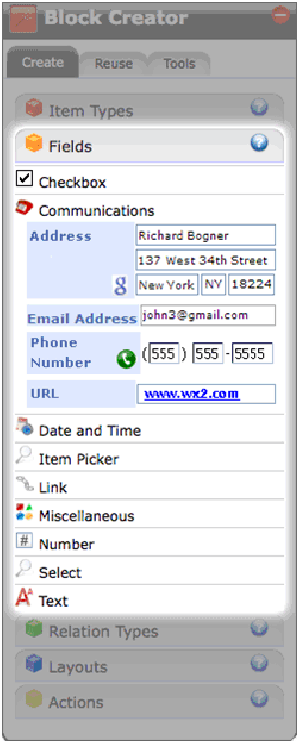
Expand any of the displayed Field categories, choose a Field, and drop it on to your Layout.
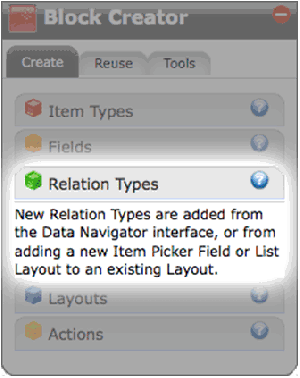
 The third bar, Relation Types, is unusual in that you may not create new Relationship Types with the Block Creator. Instead, new Relationship Types may be created with the Search Builder (discussed in WorkXpress 303) or by adding certain Field and Layout Types to your application. Clicking the bar to expand the Relation Types menu will explain this fact:
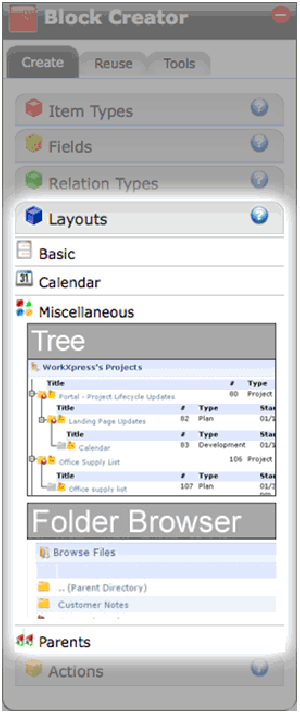
 Next, you'll come to the Layouts bar. Click to expand it and create new Layouts. Just find the Layout Type you want to use and drag it on to your application workspace.
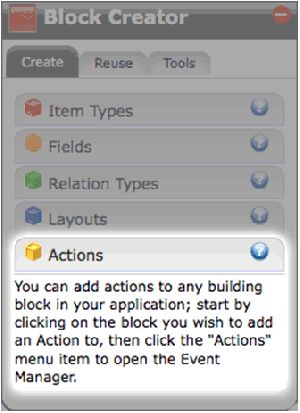
 Finally, you'll see the Actions bar. As with Relationships, Actions may not be created using the Block Creator. Instead, create Actions with the Action Manager, accessed via the flyout menu for any of the Blocks in your application. Expanding this bar yields that information:
The Reuse tab enables you to reuse Fields, Layouts, and Relationships you've already created in your application.
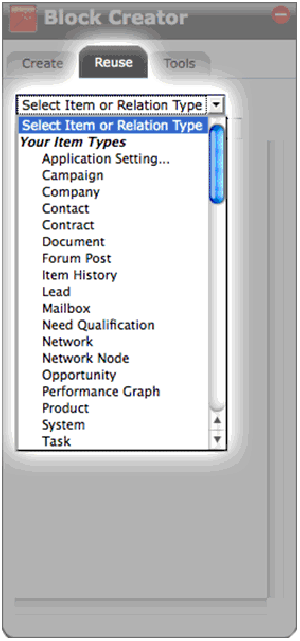
You may select an Item or Relationship Type and choose to reuse any Blocks about them.
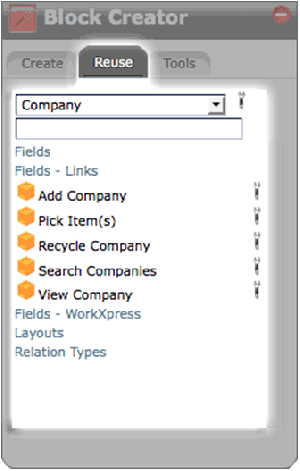
To reuse a Block, just drag it from the list into your current Layout.
The wrench icons beside every Block open the Block Editor, which will be discussed in our next lesson.
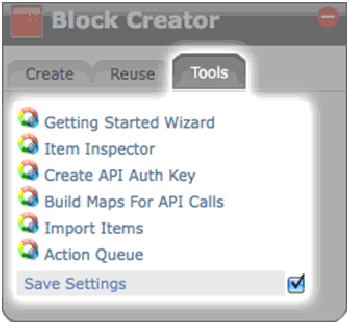
Under the Tools tab you'll find several utilities that will simplify some common WorkXpress tasks and provide detailed information about certain Blocks. Selecting the Save Settings check box will preserve any changes you've made to the Block Creator interface.
![]() This lesson will introduce you to the Block Editor in WorkXpress. The Block Editor allows you to view and manipulate all of the settings for any Block in your application.
This lesson will introduce you to the Block Editor in WorkXpress. The Block Editor allows you to view and manipulate all of the settings for any Block in your application.
After completing this lesson, you should be able to answer these questions:
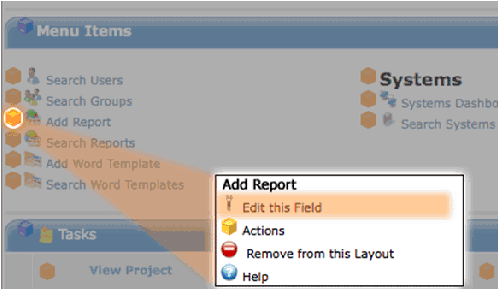
To access the Block Editor, select the Edit This… menu option from the flyout menu for any Block in your application workspace. For example, after clicking on the Block icon for the Company Field below, we would choose Edit This Field to open the Block Editor for that Field:
The Block Editor resides at the bottom of the application workspace. When you choose to edit a Block, the Block Editor's interface will expand upwards and display all of the settings for that Block. You may toggle display of the Block Editor interface in your workspace by clicking the arrows ( ![]() /
/![]() ) on the right side of the Block Editor Tool's header bar.
) on the right side of the Block Editor Tool's header bar.
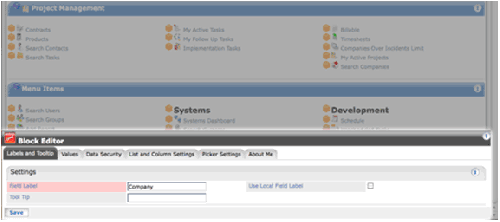
The top of the Block Editor interface consists of a ribbon control that logically categorizes by feature every setting available for the Block you've chosen to edit. A different assortment of choices will be displayed in the ribbon for any given Block because each type of Block may have an entirely different group of settings. As you can see in the example above, this Field's Block Editor ribbon has buttons that organize settings for Field Label, List Appearance, Tooltip, WorkXpress Link Appearance, and Block Association.
Opening the Block Editor for a different Block will display an assortment of ribbon buttons relevant to that Block that will logically arrange the settings for that Block.
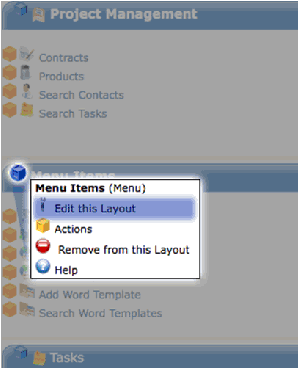
Above, we chose to edit a Layout Block. The Block Editor will show a different ribbon containing specific settings for editing that Block. For your convenience, these options are also grouped by category: Appearance, Configuration, Data Entry, and Security.
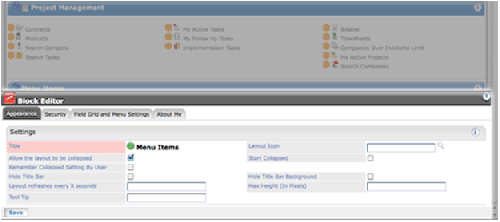
Notice that there's an Appearance category on the ribbons for both Block Editor examples from above. You may edit the appearance of any Field or Layout, so the Block Editor will nearly always include an Appearance section. The specific functional options for each type of Block, such as security settings, however, will vary and will be organized under ribbon buttons that differ for each type of Block.
A final, important note about the Block Editor: all Blocks have a Block Association button that allows you to view and edit settings about that Block's Local and Global Block Associations. Local Block Association is discussed in detail in Context. Recall our discussion about Fields from our previous lessons discussing the Data and Presentation Layers in WorkXpress. Fields display information about Items, and in the Block Association section, you will find a Global Block Association area that details the Item Type the Field you're editing displays information about.

![]() This class will teach you how to access and use the Search Builder in WorkXpress. The Search Builder provides you with a rich, visual, WYSIWYG interface that easily enables you to visually build and manage complex queries to retrieve information from your data layer that in a traditional application would need to be written by a database developer or administrator using a highly specialized language.
This class will teach you how to access and use the Search Builder in WorkXpress. The Search Builder provides you with a rich, visual, WYSIWYG interface that easily enables you to visually build and manage complex queries to retrieve information from your data layer that in a traditional application would need to be written by a database developer or administrator using a highly specialized language.
After completing this lesson, you should be able to answer these questions:
Put simply, a query is a lookup of data from a database. Although that may sound like a tricky thing to accomplish, in WorkXpress it's very easy because you use the WorkXpress visual Search Builder Tool to look up your data.
You may access the Search Builder by clicking its icon (![]() ) whenever it's displayed as part of a Block's settings in the Block Editor. That is, when a query is potentially needed, the Search Builder will make itself available to you. It will launch in a separate browser window.
) whenever it's displayed as part of a Block's settings in the Block Editor. That is, when a query is potentially needed, the Search Builder will make itself available to you. It will launch in a separate browser window.

Often, the Search Builder will launch in tandem with the Expression Builder because both tools perform the related function of allowing you to manipulate parts of the data layer. We'll cover the Expression Builder in our next lesson.
You will need to familiarize yourself with each of the four sections of the Search Builder Tool.
Use the Context Section to change the starting point (the starting “node”) for your query.

In the Query Section, you will specify the details of your data query. The Query Section provides an interactive visual map of your query.
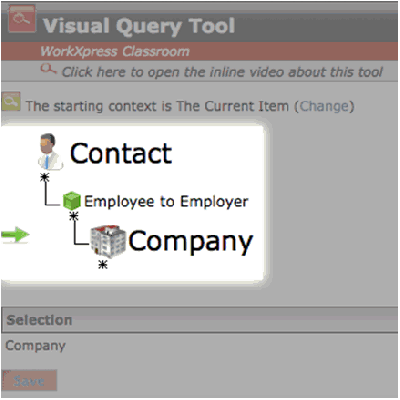
As you complete your query you will likely make some selections for what you want to see in your results.
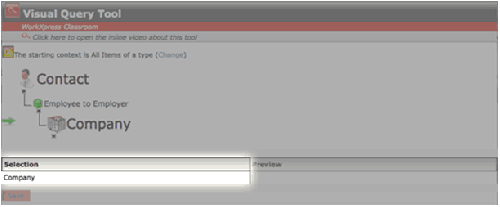
The Selection Section shows what you have selected with the green arrow in the query section.
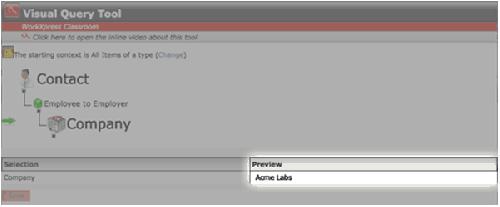
The Preview Section queries the database based on the query you've built and returns the actual results of that query given your current context (see Context).
A Query may include the following four elements, broken out by function:
What Items or Relationships am I getting my data from?
→ Node
→ Filter
→ Path
Which data do I want to get?
→ Selection
Taken together, these are the four elements of a query, and will allow you to get any data from any part of WorkXpress. These elements are further defined below.
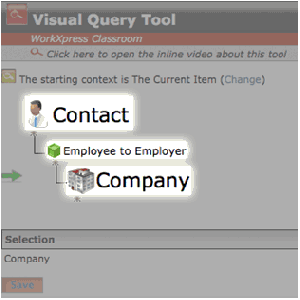
A node is visually represented in the Search Builder as a row or level of the query (see the image below). You can think of a node as a representation of a set of Items or Relationships from which you can get Fields of data. A more technical description is that a node is any level of the query that is represented by either an Item or a Relationship, or in some cases, a branch of a path (covered below).
Nodes are important because you can select them, you can usually select Fields of data from them, and you can apply filters to them.
Remember that the node your query begins on (the topmost node) is a special node in that it is the result of your current “context” (see Context).
The three highlighted items in the image below are each nodes:
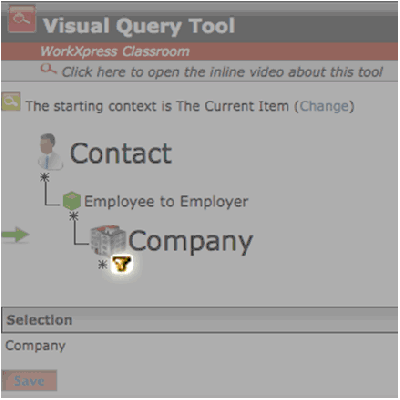
A filter is used to restrict a node. For example, if your node is composed of “Accounts”, you might add a filter to say “Accounts <Where the status is “hot lead”>. In this example, the phrase “where the status is hot lead” is the filter you have applied to your node. The result then is that your list of Accounts will only include the smaller set of accounts that happen to be in the “hot lead” status at the time the query is performed.
Think of a filter as the tool you use to narrow down your set of Items or Relationships.
Below is an example of a filter and how its icon appears in the Search Builder map when applied.

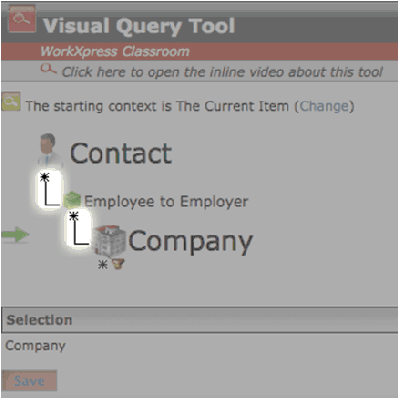
A path is the manner by which two nodes are connected. In database terminology this is sometimes referred to as a “join”. For example, you might build a query of all of your Accounts and each of their Employees. You would start on the Accounts Item Type, path across your Employer to Employee Relationship, and then end on your Contacts item type.
Some paths can be simple, others more complex, but paths do impart complex meanings governing how you query your database for sets and subsets of information.
The image below shows the path your query follows, represented by the highlighted solid black lines:
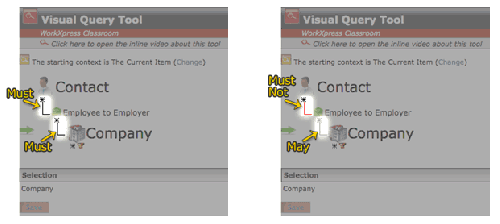
By default, all paths are “Must” paths. That is, anything at the end of the path must exist in order for the query to return data. There are times, however, when you will want to build a path where the things on the path “Must Not” exist, or even where they “May” exist.
The image on the left shows must paths. The Search Builder has been used to change those paths in the right-hand image to a “Must Not” path between the Contact Item and the Employee to Employer Relationship, represented by a red path line, and a “May” path between the Relationship and the Company Item, represented by a grey line.
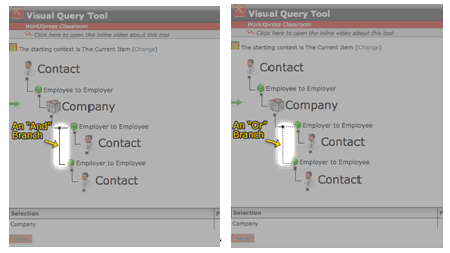
At any point in a path, you may add a branch. A branch is simply a split in the path, allowing it to take two different directions.
By default, all branches are “And” branches, meaning that “Branch A AND Branch B” must both be true. However, you can change a branch to be an “OR” branch, meaning that either “Branch A OR Branch B” must be true, but not necessarily both.
Up to this point we've discussed the three elements of a query that result in determining a set of Items or Relationships that you are seeking to act upon.
However, after you've defined the starting point, nodes and paths of your query, you will likely want to pick some results. These choices represent your “Selection”…they are the reason for your query. The selection is “the data you want to get from the database”.
One use of the Selection option is to choose a specific set of Items or Relationships. To do this you would click on the node and in the flyout menu choose “select this block”. The result will be that the Selector (the green arrow in the interface) will rest on that node.
Many times, you will use the Query Builder tool to get elements of data. Once you've built your query, click on any node and make the “Select Fields From this Block” selection. You may then select whichever Fields you wish to pull data from. The Query Builder will pull that data for each Item or Relationship represented by the node you are selecting from.
There are several activities you can perform in the course of building a query. Many of these activities can be performed in any order you choose. Building your query could involve the following activities:
→ Choosing a starting node (Start my query on <this/these Item(s)>)
→ Adding Pathing - moving across Relationships to new Item Types (“JOIN <this> to <that>)
→ Path Restrictions (Join where <target> may/must/must not EXIST)
→ Path Branching (“Path a AND/OR Path b”)
→ Node Filtering (“all of these WHERE <your filter is true>)
→ Choosing Items or Relationships
→ Choosing Fields
→ Choosing a stopping point demarcated by the Selector
In this next section, you'll learn how to perform each of the above tasks as you build your queries. Once you've built your first few queries, you'll realize how easy it is, and the process will become second nature.
By default, your query will be setup to start on the Item(s) given to it by the Block from which you accessed the Search Builder (said differently, the query will start based on the context of its parent Block; context is discussed here). You may change that context by clicking the “Change” link, located beside the description of the current context. Doing so will open a new page that will allow you to change the starting point (the context) of the query:
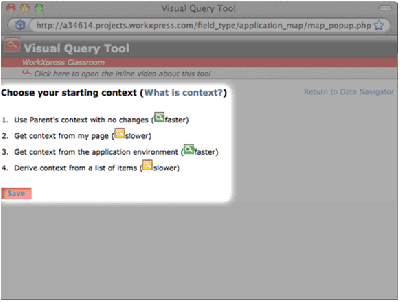
Several options are available to change the starting point of your query to: Use Parent's context with no changes - The default setting whereby context is simply inherited from the parent. Build your query by branching off of this starting point.
Get context from my page - Allows you to change context to a particular node from the page on which you're currently working. Chose the node you wish to start your query on and build your query from there.
Get context from the application environment - Allows you to change context to that of the current application or current user. Make your selection, and build your query from the user or application nodes, filtered to be about only the current user or application.
Derive context from a list of items - Allows you to change context to any Item Type you've created for your application as well as Item Types created by WorkXpress when you spun up your project. Choose this Item Type, and build your query from that search result list (“from that node”).
In summary, you may view and change the starting context for your query using the context section of the Search Builder.
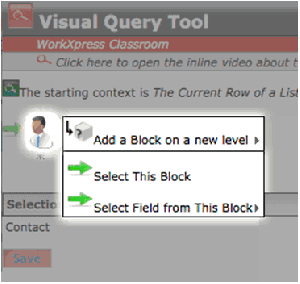
Clicking on any node will generate a menu of choices for that node. The first choice is always the “Add a Block on a new level” choice. This allows you to create a network of interconnected nodes (usually Item Types and Relationship Types).
The following images illustrate the procedure of developing a simple path. Step 1: click on any node:
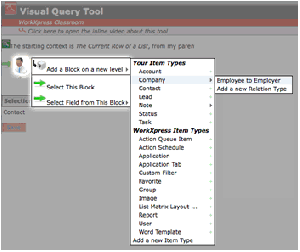
Step 2: use the flyouts to select Items and Relationships you wish to path across:
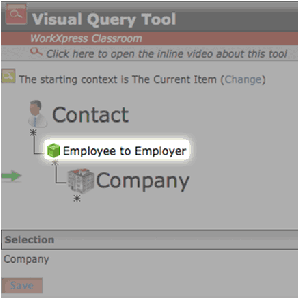
Step 3: review your results. In this query, you are joining all of your Contacts and Companies using the Employee to Employer Relationship:
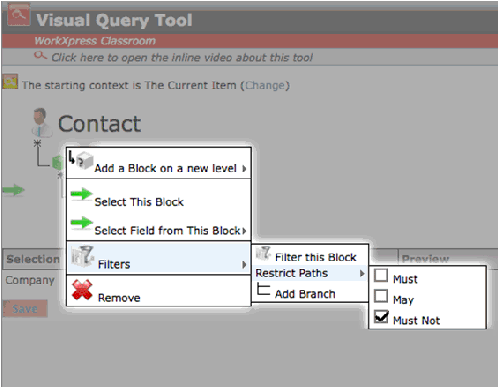
At the top of any segment of a path, simply click the node or asterisk and in the resulting flyout menu choose “Filters”, then “Restrict Paths”, and then whether you prefer the options of must, must not, or may.
The below chart shows your query from before with the defaulted must paths in place (the solid black lines):
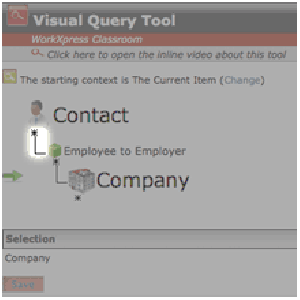
To change your path restriction, start by clicking on the Node whose path you wish to restrict, select the “filter” flyout menu, then “Restrict Paths” to make your choice. We've chosen to use a must not path in the image below:
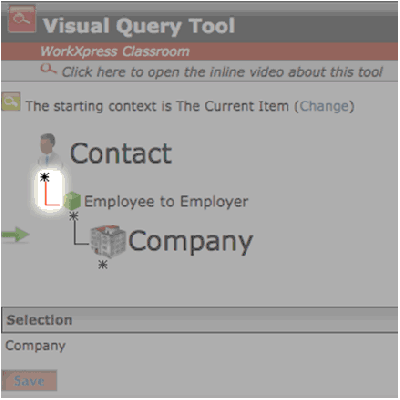
Finally, review your results. Notice the red line, which signifies a must not path. In this example, we've built the query to restrict the path so that the connection between your Contact and your Employee to Employer Relationship must not exist.
You can add a branch at any node in your query.
The simplest branch to add occurs automatically whenever you add a path to a node that already has a child path associated with it. Any node may have two or more paths extending from it, so the system automatically creates a branch.
To create this type of branch, simply follow the procedure for “Adding a Node” using a node that already has a pre-existing branch.
You may click on any node, and in the “filters” menu, you will find “Add a Branch”. Clicking this filter type creates the structure of a branch, which you can later add nodes to.
Any node may be filtered by the data in the Fields that are associated with that node.
Click on the node and choose “Filters” then “Filter this Block”. The result will appear as shown below:

You can see that filtering by any Field available for that Block is possible.
One of the WorkXpress Search Builder's more interesting and powerful features is the ability to build dynamic evaluations. These are evaluations where the value being evaluated against is itself another variable! What's more, there are no limits to how many times you can nest these evaluated filters.
For example, a normal filter might be “where the State is <Pennsylvania>”. An evaluated filter instead might be something like “where the State is <check the Current User, find which Sales Team he is related to, find which State that Sales Team is responsible for, and insert that State here>”.
You create evaluated filters while in the process of creating a static filter. In the location where the static filter is entered, look for an “Expression Builder” control. Use that Expression Builder control to define your dynamic, evaluated filter.
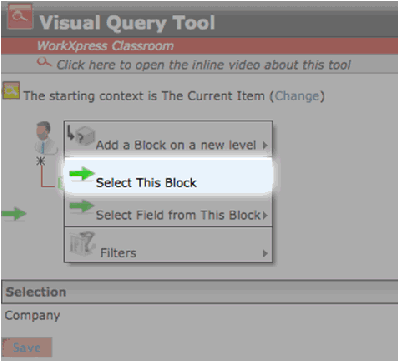
The goal of some Queries is simply to choose one or many Items, or one or many Relationships. To do this, first you must develop your path. Second, you must click on any node and choose “Select This Block”, as shown below:
As mentioned above, the goal of queries is to get data from the database, often by choosing a specific Field Block. There are two different interfaces that allow you to accomplish this task. One allows you to choose a single Field Block, the second allows you to choose many Fields from the Block.

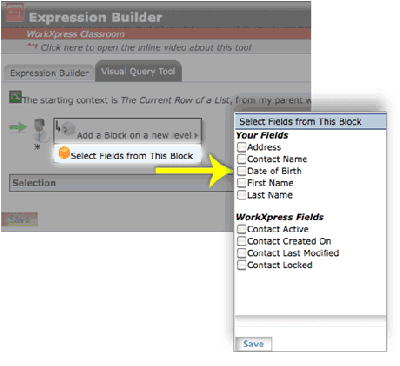
Sometimes, particularly when building lists, it is necessary to adjust the “endpoint” of your query. To do this, simply click on any node, and choose the option “Select This Block”. Notice that the Selector adjusts in your query to point at the node where you chose to end that query.
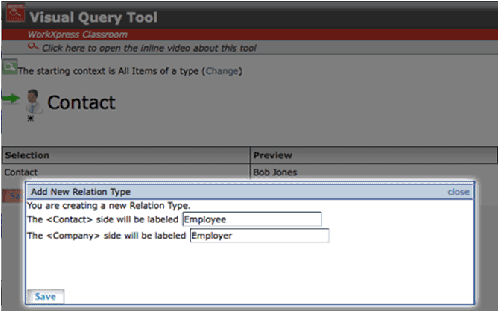
The Query Builder allows you to create new Item Types and Relationship Types from within the pathing flyout menus. In each case, the Query Builder will launch a wizard to dynamically create new Relationship or Item Types. The example below shows the “Create Relationship” wizard launched while building a path:
![]() In this class we'll discuss the Expression Builder, a visual tool that will enable you to build simple or elaborate expressions to manipulate information from your data layer and display it in your application.
In this class we'll discuss the Expression Builder, a visual tool that will enable you to build simple or elaborate expressions to manipulate information from your data layer and display it in your application.
After finishing this lesson, you should be able to answer these questions:
An expression is something commonly thought of as a “formula”. It is a combination of three things; (1) starting values, (2) manipulation of those values, and (3) a resulting value(s). Each of these properties of an expression is explained in greater detail below.
Starting values for an expression, if they exist, always come from the database. It is very important to note that you may have a static expression whereby you don't start with any values from the database. In a static expression you simply type in the result that you want to see output. When an expression starts with data from the database, it is referred to as a dynamic expression, because the expression results are variable based on the starting data pulled from the database.
Manipulation involves taking the starting data and transforming it into something else. Manipulation can involve the data itself or merely the appearance of the data (for example adding “bold” or increasing the font size). Manipulation may include the use of some combination of text or numerical functions, mathematical functions, application of html markup, and looping expressions and subexpressions.
In static expressions, manipulation simply involves entering the static values you wish your expression to output and, possibly, formatting them.
What comes out of an expression is its resulting value. This is always the product of your starting values and the subsequent manipulation.
Your results can be either plaintext or html-enabled. Enabling html will attempt to present your results with html formatting enforced. Plaintext, on the other hand, will simply display all characters in the result, including any html tags that may be present.
To access the tool, click its icon (![]() ) wherever you find it in the Block Editor or Action Manager tools. The Expression Builder will launch in a separate browser window, and it always launches with an attached Query Builder because the tools work in tandem. The Query Builder is used to define starting data for your Expression Builder.
) wherever you find it in the Block Editor or Action Manager tools. The Expression Builder will launch in a separate browser window, and it always launches with an attached Query Builder because the tools work in tandem. The Query Builder is used to define starting data for your Expression Builder.
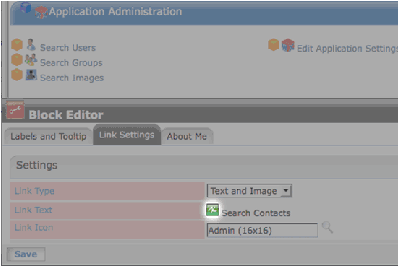
Let's break down each area of the Expression Builder and examine its use.
The image below shows the Expression Builder, with the Field/Part/Output Format selector highlighted.
Simply choose the Field, Field Part or Output Format you want, and press the green arrow to insert it into your Expression.
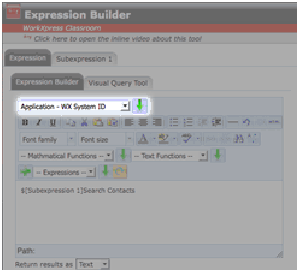
The Field Selector reads Fields chosen in the attached Query Builder and allows you to select them to use in your Expression.
Often, a Field's Parts will be available in this selection area as well. Additionally, you can sometimes also choose Output Formats in this area. Field Parts and Output formats are described below. Fields, Field Parts and Output Formats populate the select list automatically once you have chosen their respective Field in the attached Query Builder.
Simply choose your Field, Field Part, or Output Format in the selectors and then press the green arrow to move that selection into the Expression Box area.
Field Parts are the components that taken together make up a certain Field. In the Query Builder you need only identify the Fields you want to pull from, but here in the Expression Builder you can break that Field into its Parts. For example, when you pull an Address Field from the Query Builder, you can work with the entire address in your expression but you can also work with its Field Parts such as City, State and Zip.
Sometimes a Field could also give you Output Formats to work with. Output Formats are different ways to represent the same piece of information. For example a Date Field doesn't have any Field Parts, but it does have many possible Output Formats. Some examples include: Month Name, Month Name Abbreviated, Month Number, and Month Number with Leading Zero. These Output Formats display as January, Jan, 1 and 01 respectively.
This section of the Expression Builder allows you to add a variety of HTML formatting to the output of your expression. Use this section to cut, copy or paste text into and out of the Workspace, manipulate fonts and styles, change alignment, and create lists.
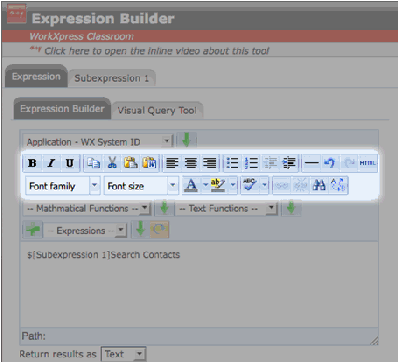
These controls insert actual hypertext markup language (HTML) into your Expression, however the Expression Box itself does not display the raw HTML, only the formatted results of it. To see the full expression as its HTML source code click the HTML button in the upper right hand corner of this section.
This section of the Expression Builder allows you to apply a variety of mathematic or text based functions.
Math functions require number fields, or strict numeric text extracted from a text field, function or subexpression in order to function properly. Use the “Arithmetic Function” choice to perform any type of mathematic calculation.
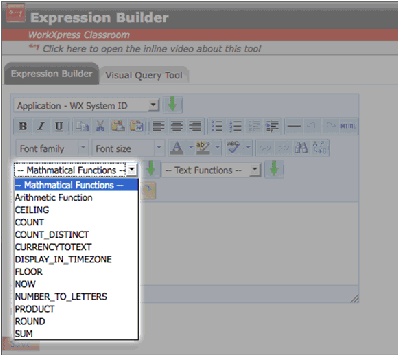
Choose the function you want and use the green arrow to insert it into the Expression Box. It will appear with its variables in place, but you will need to substitute your values or variables for the default ones.
Here is a list of math functions: Arithmetic Functions Ceiling Count Count Distinct Currency to Text Display in Timezone Floor Now Number to Letters Product Round Sum
Text Functions perform in every way like the Math Functions above except they are focused on text or “string” manipulation.
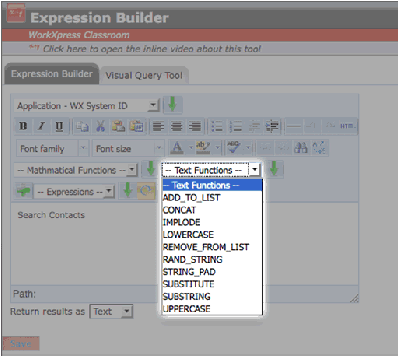
Choose the function you want and use the green arrow to insert it into the Expression Box. It will appear with its variables in place, but you will need to substitute your values or variables for the default ones.
Here is a list of text functions: Add to List Concat Implode Lowercase Remove from List Random String String Padding Substitute Substring Uppercase
Sometimes you will develop data in your Query Builder that returns multiple items. You will need to understand how you want your expression to loop over each of these items to achieve your desired result.
For example, you may want to sum the “amount” Field for each value. Or, you may want to “concatenate”, or join together, the names of each item in the result set, separated by commas.
Some functions are inherently “looping” functions, meaning by default they will loop over each item in the result set. The “Sum” function is a good example of an inherently looping function.
Other functions are designed to operate on a single result from a single item, and become “confused” when you pass it multiple items.
Turning on or off the “Looping Controls” intrinsically instructs the Expression Box to act as though it will or will not receive multiple items. This concept will be covered more in an advanced topic.
You may toggle the Loop Control function to allow this expression to loop through its results for those functions which do not inherently use looping, as described above. Please see the advanced topic on looping for a greater discussion of how and when to enable or disable looping controls in the Expression Builder tool.
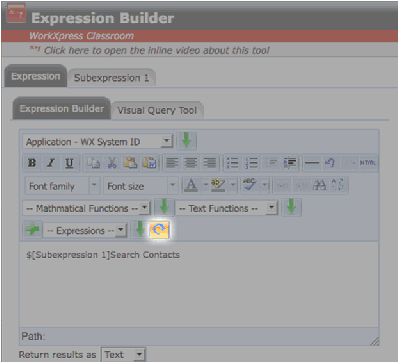
A subexpressions is simply a complete expression (including Query Builder) that is evaluated independently, and whose result is inserted into an expression. You can nest as many subexpressions as you like into your expression, or into each other. The diagram below highlights a newly created tab for “Subexpression 1”.
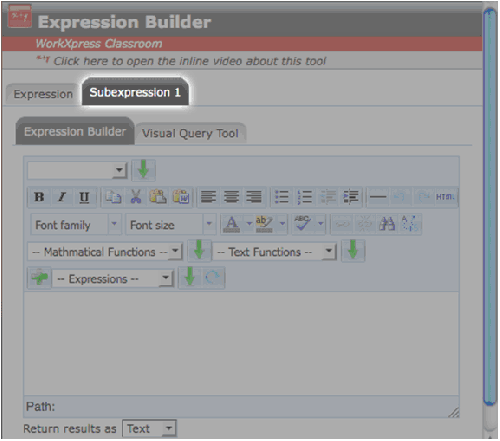
To create a subexpression, simply click the + sign. This will add a Subexpression Tab to the top of your Expression Builder tool, and that tab will contain a full Expression Builder interface. To insert a subexpression result into your expression, simply select it and press the green arrow to insert it into your Expression Box.
The Expression Box contains the body of the expression you are building. Here, you will manipulate your starting values (Fields, Field Parts, Output Formats) and this is where you will apply HTML formatting. You will insert Math and Text Functions, as well as subexpressions, here.
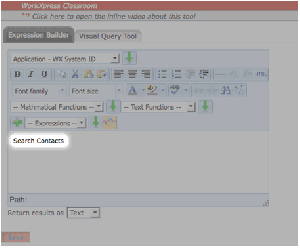
Of course, as the example above shows, you an always just type in static text (referred to as a static expression). in this example, the result of this expression will always simply be the words “Search Contacts” and it will always be formatted exactly as shown.
The HTML/Text toggle allows you to choose to return results as HTML or plaintext. Choosing to display your results as HTML will output formatted HTML with any of the HTML options you've chosen to use in your expression. Outputting the results of your expression as plaintext allows you to preserve and present any HTML source code in addition to the values you intended to output.

Said differently, Use the HTML/Text toggle to determine how you want to present your results.
So for example, lets say you are outputting the word “result” but bolded to appear as “result”. with HTML toggled on, your expression will output “result”. With Text toggled on, your expression will output “result.â€
![]() The Action Manager is the last of the five tools we'll discuss in this series of classes. Use it to create and manipulate Actions associated with any Block.
The Action Manager is the last of the five tools we'll discuss in this series of classes. Use it to create and manipulate Actions associated with any Block.
After completing this lesson, you should be able to answer these questions:
Put simply, the Action Manager displays the procedure (see The Logic Layer) associated with any combination of a WorkXpress Building Block (Item, Relationship, Field or Layout) and a corresponding trigger. For example, “saving” (the trigger) a “Layout” (the Block) most likely has an Action Manager Tool associated with it, and that Tool exposes the automation procedure that will happen when that Layout is saved.
Note that different types of Blocks may have different types of triggers associated with them. For example a link Field doesn't “save” per se, it gets “clicked on”. Therefore, the trigger for a link Field is “link is clicked on”.
However, the result of any trigger on any Block is always a procedure, and that procedure is always displayed in the Action Manager tool.
To access the Action Manager, click on any Block in your application and choose ![]() Actions from the flyout menu.
Actions from the flyout menu.
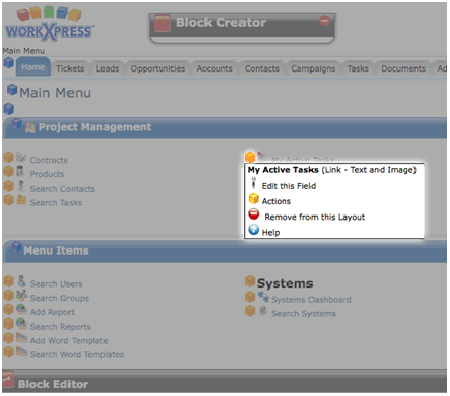
The Action Manager will then launch in a separate popup browser window.
Loading any Action Manager will result in a screen similar to the example shown below:

This tool fundamentally has two parts: triggers and procedures.
Across the top of each Action Manager interface are tabs that group the various available triggers by type. These types correspond to the events that could take place from the Block you've clicked, and are usually arranged in order of use.
For example, for an interface Block such as a Layout you might see tabs representing “Page Load”, “Page Use” (Interface Actions), Pre-Save (Validation), and Save. Taken together, those four tabs organize all the events in the use-cycle of that Layout. The image below shows three of these trigger “groupings” seen in the Action Manager of a link Field.
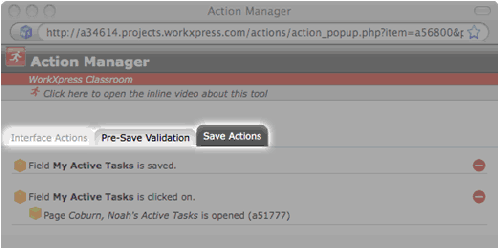
Interface Actions represent common “javascript” style triggers such as “on click” or “lose focus”. These triggers are designed to give the builder rich interactive control over an interface without the user having to save and reload the page. Interface Actions may not be available at this time.
This tab displays the triggers fired by a Pre-Save Validation. Pre-Save triggers occur when a user indicates a desire to “Save” but before any saving actually takes place. These are special triggers that serve to validate the user's entry, and if invalidated, display an error message. If pre-save validation fails, the “Save” triggers will not fire.
This tab displays the procedures triggered when a Block is saved, assuming it has passed validation. You may add or edit any Control or Execution Action Type for any Block affected by a save procedure.
Note: The Save Actions tab is sometimes a catch-all for miscellaneous triggers that don't belong anywhere else. For example, a link Field is not necessarily “saved”, it is “clicked on”. This trigger will appear in the Save Actions tab.
The second part of any Action Manager interface is the procedure itself. The procedure is where you will attach Actions, and in so doing, build automation.
The below image shows the area of the Action Manager that represents the available procedures.
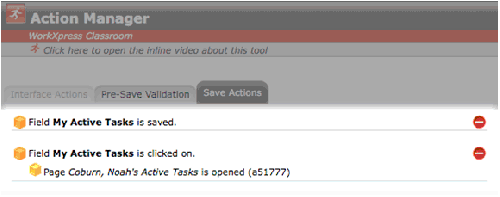
Note that you can click the ![]() or
or ![]() buttons to show or hide the children of any element of a procedure.
buttons to show or hide the children of any element of a procedure.
Choose any procedure for which you'd like to create or manage an Action.
You may add an Action to any Block in the procedure simply by clicking the Building Bock icon.
From the resulting flyout menu, choose the Action Type you wish to add to the procedure.
Note that the added Action will always be a direct child of the Action Block from which it was added. Because Actions are processed in order, you want to make sure that you are inserting/adding your new Action to the right place in your procedure.
The image below shows the flyout menus resulting from clicking on a Block in a procedure:
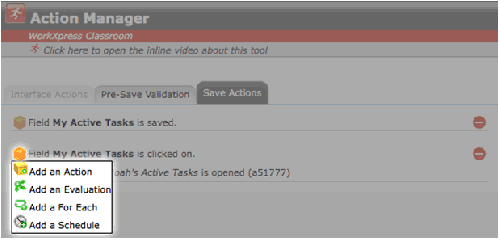
There are four classes of Actions you can add from this flyout. They're detailed below:
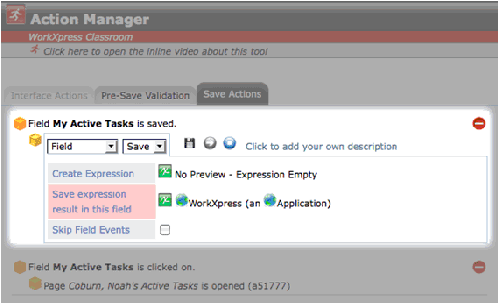
The most common type of Action is the Execution Action. Generically, this class of Actions simply are called “Actions”, although the other classes of Actions are also a part of the WorkXpress building block called “Action”.
Select the “Add an Action” option on the flyout menu to add any kind of Execution Action as a child at this point in the procedure.
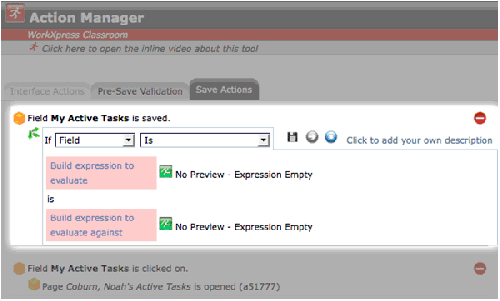
Selecting this option will allow you to add an Evaluation Control Action as a child at this point in the procedure.
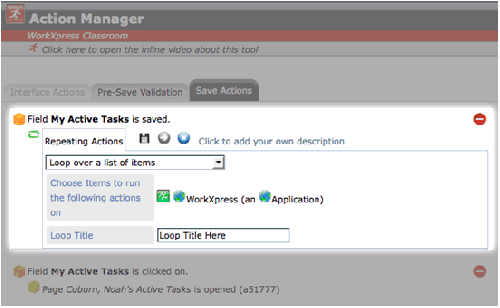
Selecting this option will allow you to add a For Each Control Action as a child at this point in the procedure.
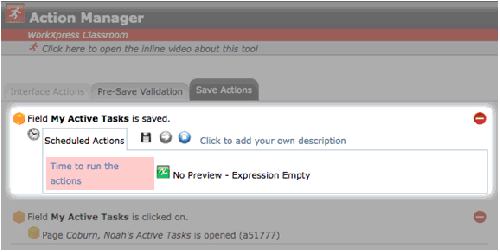
Selecting this option will allow you to add a Schedule Control Action as a child at this point in the procedure.
To edit an existing Action that already has been created for a Block in a procedure, just click the Action's Block icon and choose Edit Action.
The flyout in the image below shows what results from clicking on an existing Execution Action.

Note that other classes of Actions may have other options in their flyouts that you'll discover when clicking on their respective Block icons.
In this case you can choose to edit the Action, change its short description, delete it completely, disable it (which instructs the procedure to skip it), or ask for contextual help about this Action.