Table of Contents
Private Cloud Setup
At WorkXpress, we understand that our customers need infrastructure choice, including the ability to host WorkXpress applications using their own computing infrastructure; that is, some customers prefer to install and manage a private cloud environment. To meet that need, we offer WorkXpress Cloud's packaged as an Open Virtualization Format (OVF) compliant virtual appliance to empower those customers to host development, testing, and production applications behind their own firewalls while continuing to manage them via the WorkXpress Platform at http://platform.workxpress.com.
What will I need?
Installing WorkXpress in your private cloud is not difficult, but it will require some preparation and basic knowledge about hardware and network configuration:
- You will need to install, and have a working knowledge of an OVF compliant hypervisor to manage your private cloud infrastructure. We recommend VMware's ESXi product. Installing ESXi is beyond the scope of this document. For details and to download ESXi, please visit their product page. For support, please visit the ESXi community.
- You will need a publically routable IP address from your ISP with TCP ports 80 (www), 443 (Secure www), 22 (for secure administrative access), 36602 (application monitoring), UDP port 10161 (custom snmp port for performance monitoring and graphing functionality), ICMP echo-requests available for incoming traffic, and TCP ports 80 (www), 443 (Secure www), 465 (smtp-ssl), 10008 (application updates), UDP 123 (NTP), and UDP 53 (DNS) available for outgoing traffic.
- You will need at least 2 Processors (or cores), 6GB of RAM, and 42GB of available storage for your private cloud. 4 CPU cores or more, and 8GB or more of RAM is recommended for more than one installation.
- You will need an elementary knowledge of TCP/IP networking in order to properly configure your virtual appliance's network connection.
- You will need a basic understanding of the Domain Name System (DNS).
Why do I need an externally routable IP ?
There are two primary uses of the externally routable IP from your ISP: your access to the WorkXpress Applications installed on this Private Cloud from outside of your local network, and so the platform can communicate with the cloud for maintenance.
WorkXpress brings significant value in it's applications by deploying each one of them as a web-based application. This means that you can access it just as easily from your desk at work as you can from your desk at home, smart phone on the go, or your remote office location overseas.
The platform application is in contact with your private cloud for a variety of reasons. When you use the platform to release a new version of a Development application hosted on your private cloud, or when you trigger an update to a testing or production application from the platform, it connects to your private cloud and performs the update. When the shutdown command is triggered from the platform it connects to your private cloud to begin the operation, and more. Point and click control over your private cloud through the WorkXpress Platform is achieved with this connection.
Can I limit access by IP address ?
You can, but the private cloud has a host based firewall that limits inbound access to the required ports, so even though you may feel uneasy about letting everything in, the private cloud will only respond to requests that come to the required ports. Also keep in mind any changes to our infrastructure will require changes to any filtering you put in place.
If you still feel that you need to filter at your network edge you can use the follow as guidelines for filtering:
- Inbound access to TCP port 80 (HTTP) and TCP port 443 (HTTPS) is required for access to your application by your users. Those ports are also used by platform to manage your applications. If your application will only be accessed by users internal to your network, you can limit access to those ports to platform. Those requests will be from 104.196.195.208.
- Inbound access to TCP port 22 (SSH) is required for administration. Those requests will be from 50.73.31.59, 104.196.106.51, and 54.175.210.196.
- Inbound access to UDP port 10161, TCP port 36602 and icmp echo-requests is required for application monitoring. Those requests will be from 54.175.210.196.
- Outbound access to TCP port 80 (HTTP) and TCP port 443 (HTTPS) is required for your application to connect to platform and also for any calls to third party APIs that your application may use. It is not practical to filter this access by IP address, due to the nature of using third party APIs.
- Outbound access to UDP port 53 (DNS) is required to resolve domain names to IP addresses. This can be limited to the IP address of the DNS server that you supply during private cloud setup and 8.8.8.8. This is a DNS server that is configured as a backup.
- Outbound access to TCP port 465 (SMTP over SSL) is required to allow the system to send emails for monitoring. It is not practical to filter this access by IP address.
- Outbound access to TCP port 10008 is required for application updates. This can be limited to 50.73.31.59 and 104.196.106.51.
- Outbound access to UDP port 123 is required so that the cloud server can keep its system time up-to-date. This can be limited to (ALL) 16 IP addresses for time.nist.gov (found at http://tf.nist.gov/tf-cgi/servers.cgi) and the server ntp.ubuntu.com.
I'm ready, lets begin!
Step One: Use the WorkXpress Platform to create a new Cloud Server
Log in to the WorkXpress Platform. Once logged in, scroll down to the “Clouds” list, this displays the clouds you own, and clouds you're hosting applications on. Next, click the grey “Add Cloud” button in the top right corner of the list of clouds.
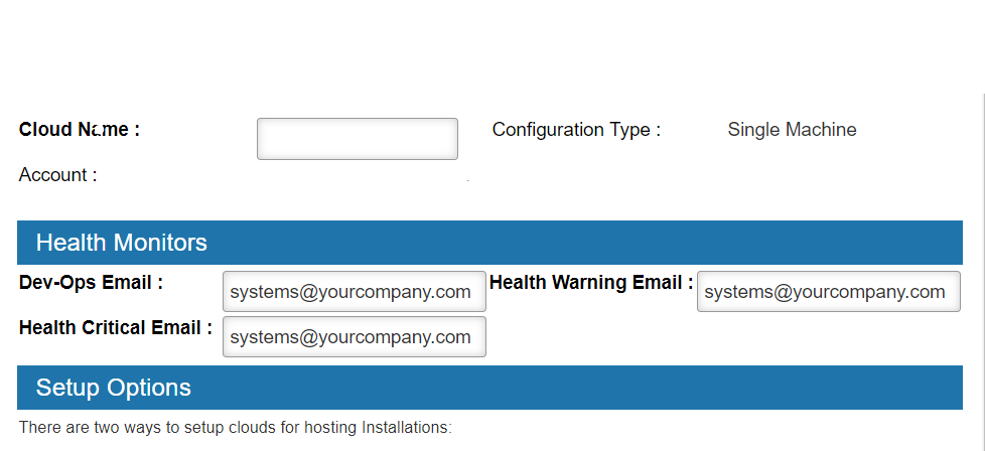
Fill in the Cloud Server Name, and the fields for what email addresses to use for warning and critical notifications as well as sales and support email addresses for your company. When you're finished, scroll to the bottom of the popup. Take not of the the “synchronization code” that will allow your virtual appliance to host WorkXpress applications.

Note: Please record this code because you will require it to complete the installation procedure.
Click the blue “Add Cloud” button and continue to step two.
Step Two: Obtain and install the WorkXpress OVF virtual appliance in your infrastructure
The WorkXpress OVF Cloud installation process will vary based on the OVF compliant hypervisor you've chosen to deploy. The instructions that follow were written specifically for installation into a VMware ESXi 5.0.0 virtualization environment.
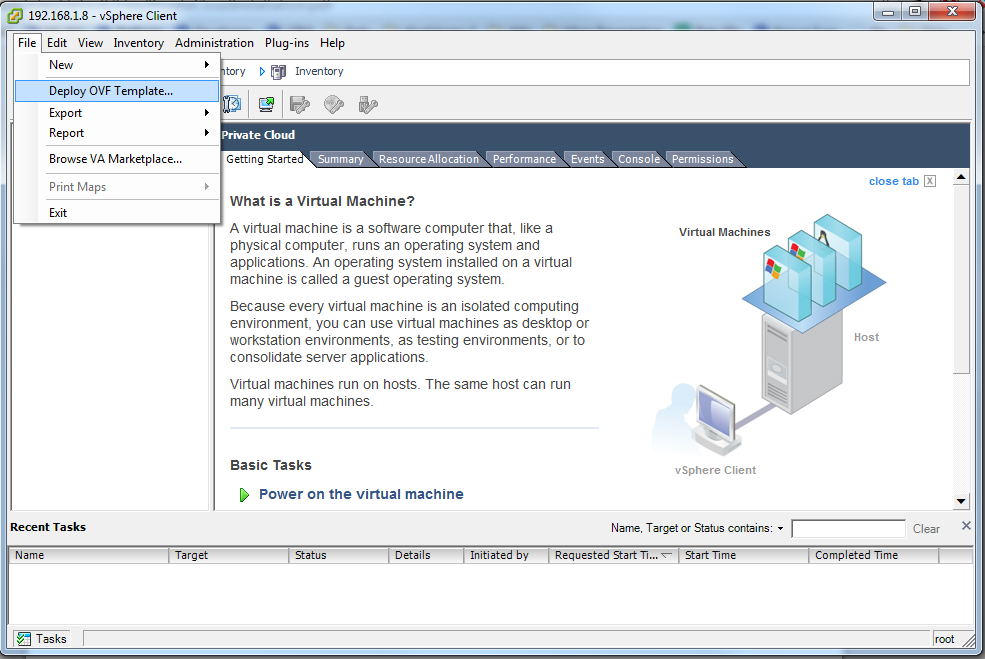
First, open the VMware Infrastructure Client (VIC) and connect to your ESX Server.
Next, choose File : Deploy OVF Template.
Then, in the “Deploy from a File or URL” field, enter : http://www.workxpress.com/sites/default/files/ovf/WorkXpress/workxpress.ovf
Click Next and answer any questions asked by the VMware installation wizard. Please consult the VMware documentation for answers to specific questions you may have related to VMware ESXi. When you reach the Network Mapping section of the Import Virtual Appliance Wizard, select the network from which your firewall expects to receive client traffic or a network that is directly connected to the internet. If you choose to connect to an internal, non-routable IP network behind your firewall, you or your network administrator should allow traffic on the following ports to reach your server:
Incoming and Outgoing Traffic:
- TCP 22: ssh
- TCP 80: http
- UDP 10161: snmp over a custom port (to enable performance monitoring and graphing functionality in WorkXpress)
- TCP 36602: application monitoring
- TCP 443: https
- ICMP echo-requests: application monitoring
Outgoing Traffic only:
- TCP 80: http
- TCP 443: https
- TCP 465: smtp-ssl
- TCP 10008: application updates
- UDP 53: dns
Click Next, review your settings, and click Finish to start the import. This process may take quite some time to finish, depending on your internet connection speed, because the image file is nearly 3GB in size. Please be patient. After the import process finishes, you're ready to move on to step three.
Step Three: Complete any private networking setup you plan to use
If you are not deploying this Private Cloud with a direct internet connection and routable IP address, you'll need to be sure do the following :
- Choose a static, private IP address to give this Cloud Server.
- Setup Port Forwarding for the routable IP address for the ports listed above into this private IP address.
Regardless of these configuration choices, you'll need to:
- Gather gateway settings
- Gather DNS settings
Step Four: Boot and configure the WorkXpress virtual appliance for the first time
Start the virtual appliance by pressing the “Play” button for your new server in the VIC's Inventory list. Your virtual appliance will boot, then launch the WorkXpress Virtual Appliance Setup Wizard.
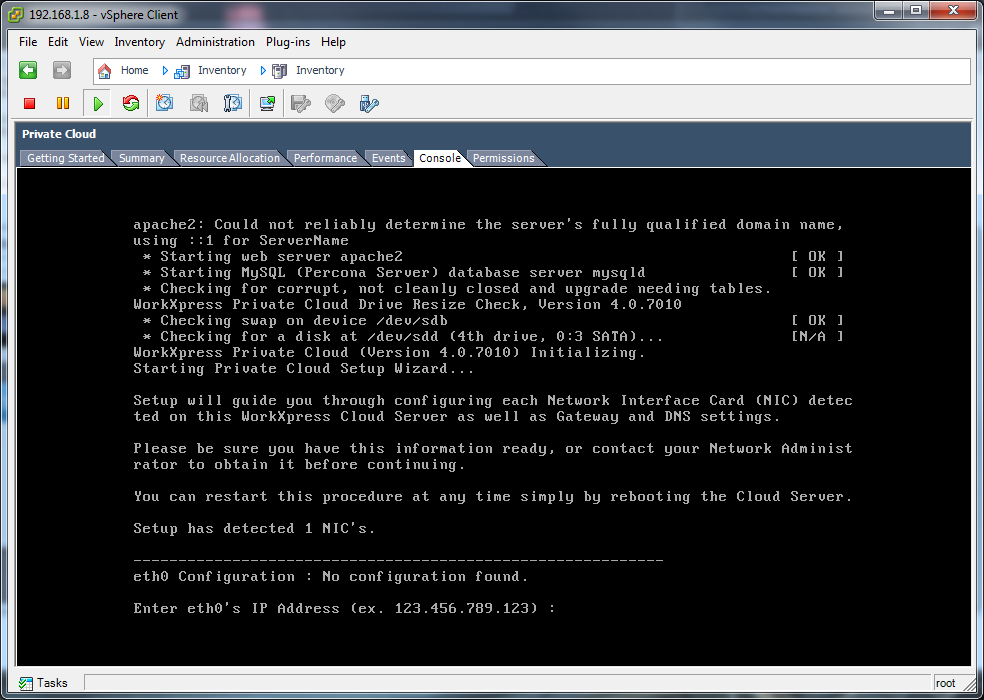
First, configure your network interface by assigning it an IP address, subnet mask, a default gateway and DNS addresses.
If you have any questions about your network interface's configuration, please consult your system administrator or contact us directly for assistance using any of the methods listed at mailto:support@workxpress.com.

Then, enter a DNS Domain and a DNS Domain Search order when asked.
If you entered only private address information, the setup utility will not ask you for the public access information.
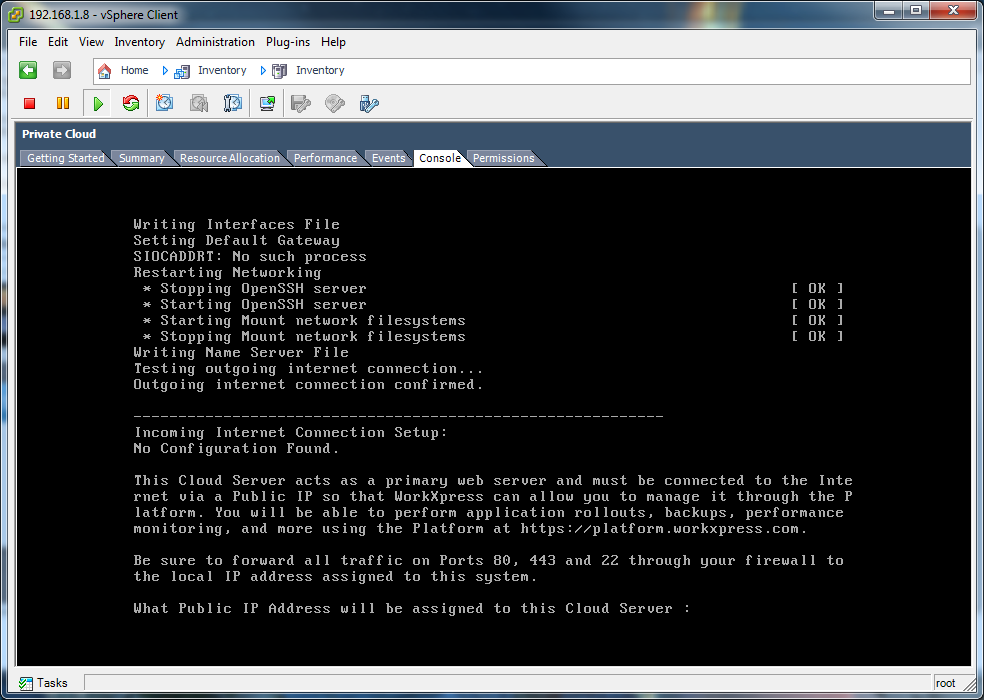
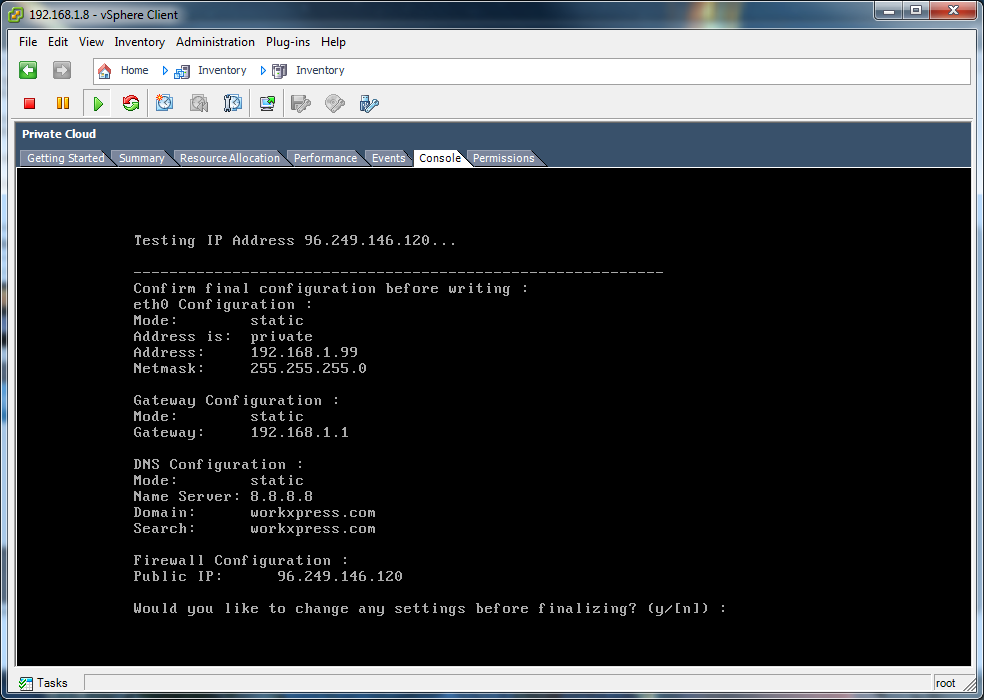
When you enter the Public IP Address, the setup utility will ask the Platform to test this external access. If the ports have not been properly forwarded to the private IP, or if the public settings are incorrect this will fail. Setup cannot continue without valid public access settings.
Once the Public test is complete all of the networking settings will be displayed for your review and approval.
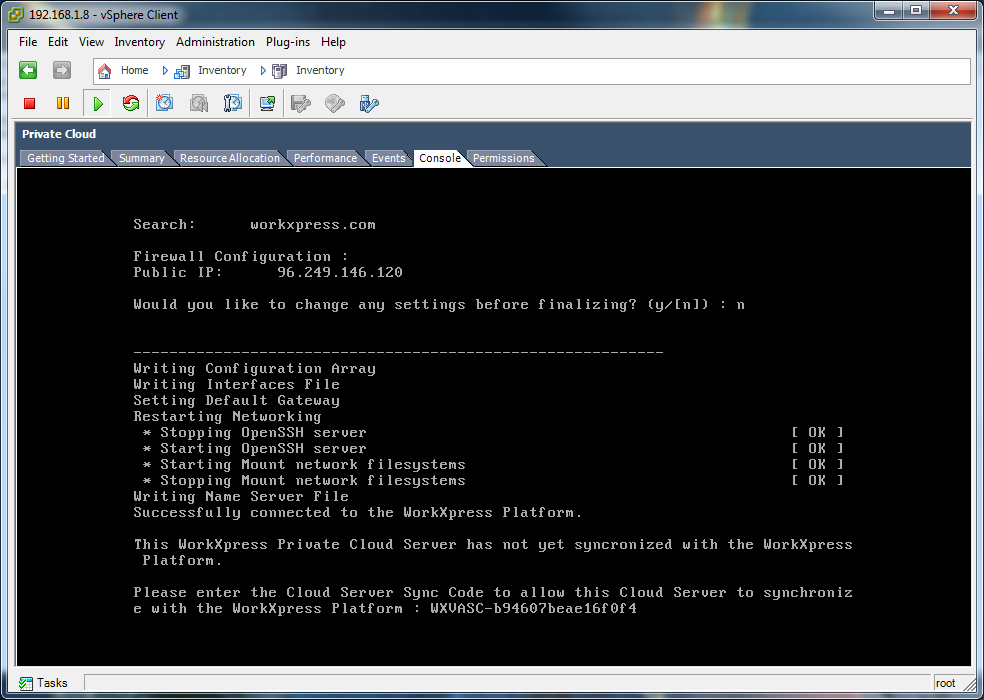
Next you'll be asked for the WorkXpress Virtual Appliance Syncronization Code you obtained earlier in the installation process.
Finally, the Private Cloud will complete it's configuration, fully activate the cloud in the WorkXpress Platform, and complete the boot process.
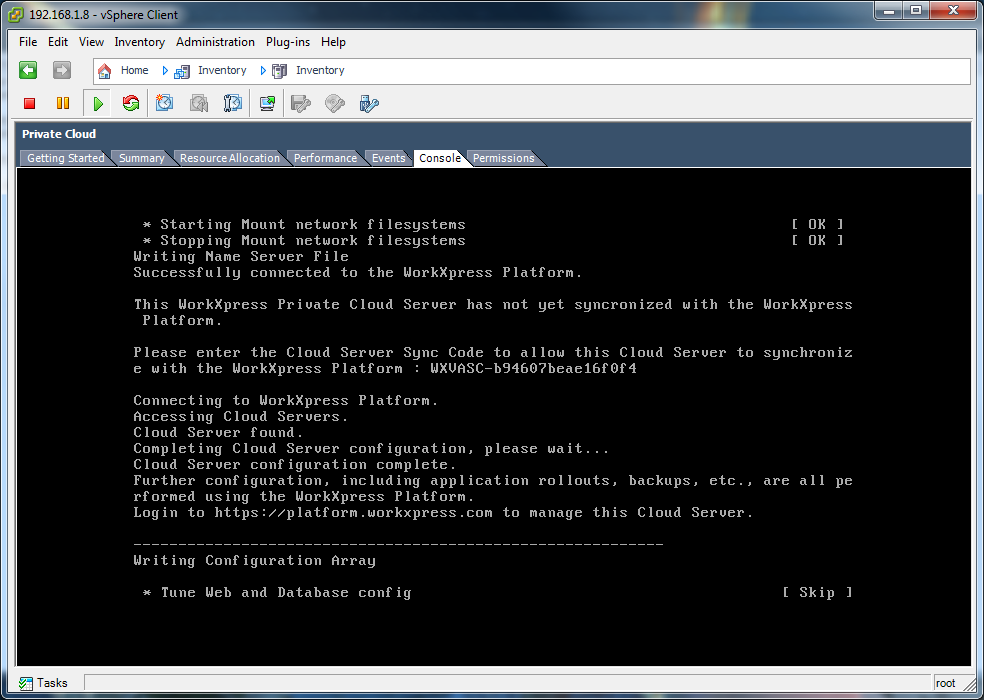
When you see this screen, the boot up process is complete, and the cloud is ready for hosting WorkXpress applications!

Return to the WorkXpress Platform to install, move, or copy applications onto your new Private Cloud.